Chicken Fried Rice is a culinary cornerstone that relies on the perfect balance of texture, temperature, and seasoning. When done correctly, every individual grain of jasmine rice should be toasted to a light golden-brown sheen, offering a slight chew that contrasts against the tender, succulent chunks of chicken. This isn’t just a quick way to use leftovers; it is a masterclass in pan-searing and heat management.
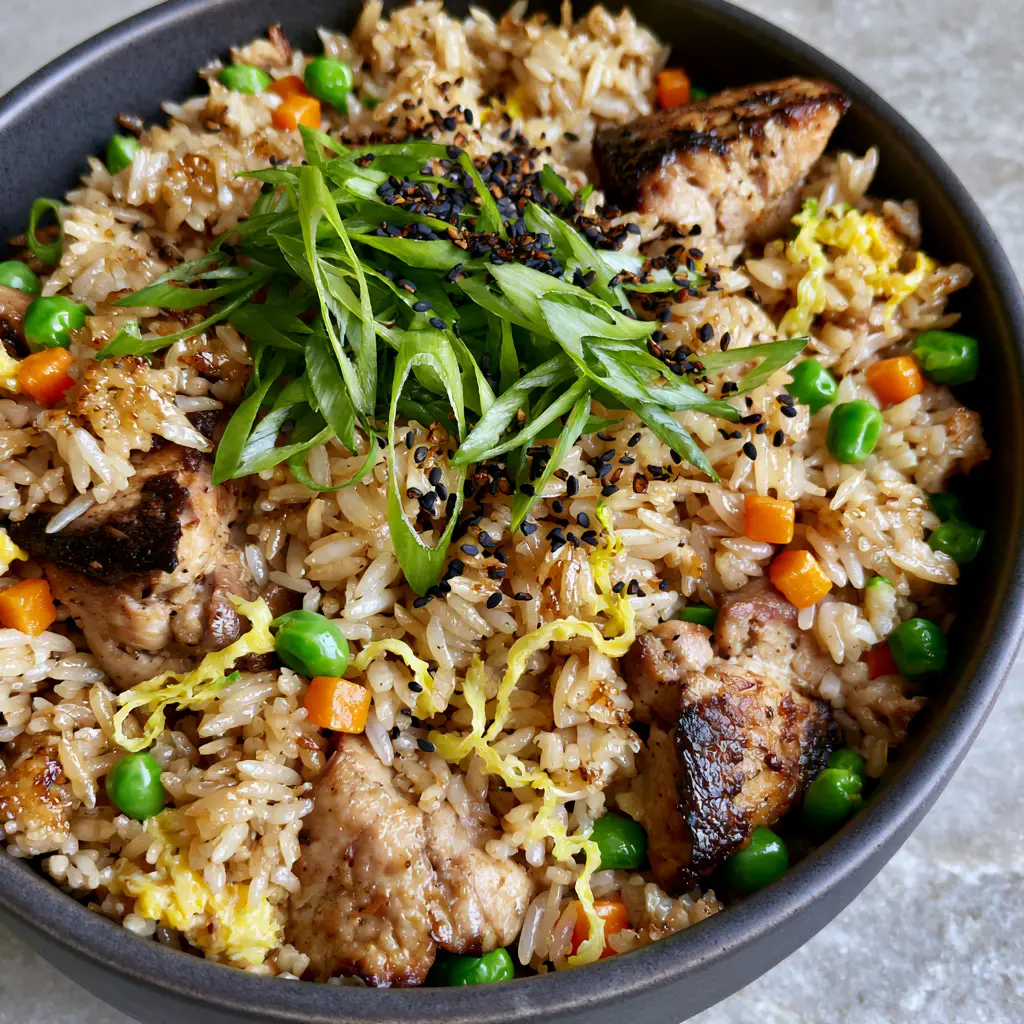
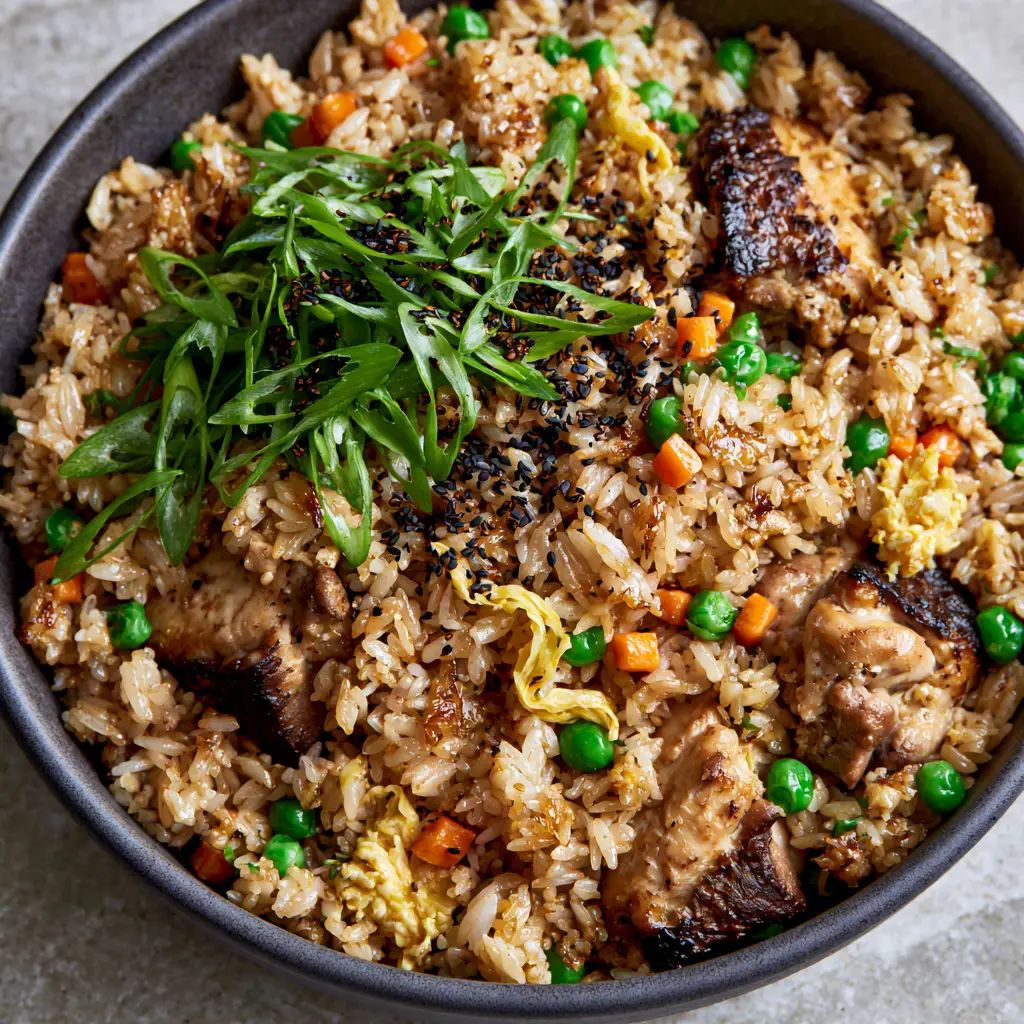
In this guide, we are recreating the exact visual masterpiece you see in professional food photography: vibrant emerald peas, tiny pops of orange carrots, and wispy ribbons of golden egg. We will move beyond mushy, clumped rice and achieve that elusive “wok-style” separation right in your home kitchen. Whether you are a weekend warrior or a weekday meal prepper, this Chicken Fried Rice will become your new gold standard.
The secret lies in the preparation of the rice and the high-heat searing of the chicken thighs. By the time you finish this recipe, you will understand the science of starch retrogradation and the Maillard reaction. This is the ultimate comfort food, elevated through technical precision and high-quality ingredients.
The Anatomy of Perfect Texture and Umami Balance
- Individual Grain Definition: Using chilled, day-old jasmine rice ensures that each grain stays separate and develops a toasted, glistening exterior without becoming gummy.
- High-Searing Success: Chicken thighs are chosen over breasts for their higher fat content, allowing for dark brown seared edges while maintaining a moist, succulent center.
- Vibrant Visual Contrast: The combination of bright orange carrots, emerald green peas, and paper-thin sliced scallions creates a professional, high-contrast aesthetic.
- Wispy Egg Architecture: Instead of heavy chunks, we create delicate, thin ribbons of fluffy yellow scrambled egg that are folded in at the final moment.
- The Umami Signature: A light soy glaze provides a savory depth without overpowering the natural aroma of the toasted sesame and jasmine rice.
Pantry Staples and Fresh Elements for Authentic Flavor
To achieve the specific visual and flavor profile of this Chicken Fried Rice, every ingredient has a scientific role to play. We start with the rice, which must be a long-grain variety to ensure the grains do not stick together during the high-heat stir-fry process.
Long-Grain Jasmine Rice: 3 cups (600g) of cooked and chilled rice. Jasmine rice offers a floral aroma and a sturdy structure that, once cooled, becomes the perfect vessel for absorbing the umami soy glaze.
Boneless Skinless Chicken Thighs: 1 lb (450g), cut into 1-inch (2.5cm) succulent chunks. Chicken thighs contain more connective tissue and fat than breasts, which prevents them from drying out during the intense heat of the pan-sear.
Aromatic Base: 3 cloves (15g) of fresh garlic and 1 tsp (5g) of freshly grated ginger. These invisible ingredients provide the foundational scent and “zing” that defines high-quality takeout-style dishes.
The Garden Mix: 1/2 cup (75g) of finely diced carrots and 1/2 cup (75g) of vibrant green frozen peas. Small, uniform dicing is key for even cooking and a beautiful, scattered visual appearance across the charcoal bowl.
The Egg Component: 2 large eggs, lightly whisked with a pinch of salt. This creates the wispy, fluffy ribbons that provide a soft texture contrast to the toasted rice grains.
Umami Glaze Foundation: 2 tbsp (30ml) of low-sodium soy sauce, 1 tsp (5ml) of toasted sesame oil, and 1/2 tsp (2.5g) of white pepper. The white pepper is crucial for that authentic, subtle heat that builds in the back of the throat.
Garnish Essentials: 2 stalks of paper-thin sliced green onions and 1 tsp (5g) of toasted black sesame seeds. These final additions provide the “pop” of color and the professional ” smartphone photo” finish that makes the dish look as good as it tastes.
High-Heat Cooking Oil: 3 tbsp (45ml) of peanut oil or vegetable oil. You need an oil with a high smoke point to achieve the seared edges on the chicken and the toasted sheen on the rice without burning.
Essential Tools for Pan-Searing Mastery
To replicate the high-angle, close-up shot of this Chicken Fried Rice, you need tools that can handle high temperatures and allow for rapid movement. A traditional carbon steel wok is ideal, but a large, heavy-bottomed cast iron or stainless steel skillet works beautifully on modern stovetops.
You will also need a wide metal spatula or a “hoak” (wok spatula). The flat edge allows you to scrape the bottom of the pan, ensuring the soy glaze caramelizes on the rice rather than sticking to the cooking surface. A sharp chef’s knife is non-negotiable for achieving those paper-thin scallion slices and the tiny, uniform carrot dice.
Step-by-Step Evolution of the Ultimate Chicken Fried Rice
Phase 1: Preparing the Rice and Searing the Chicken
Begin by ensuring your jasmine rice is completely cold. If it is clumpy, gently break it apart with damp hands until the grains are individual and free-flowing. This is the first step toward achieving that glistening, separated look seen in our visual blueprint.
Heat 1 tbsp (15ml) of peanut oil in your pan over medium-high heat until it begins to shimmer. Add the chicken thigh chunks in a single layer. Resist the urge to move them immediately; let them sear for 2-3 minutes until a deep golden-brown crust forms on the bottom. Flip and cook for another 2 minutes until the centers are moist and the edges are beautifully browned. Remove the chicken from the pan and set aside.
Phase 2: Developing the Aromatics and Vegetables
In the same pan, add another 1 tbsp (15ml) of oil if needed. Toss in the finely diced carrots. Sauté for 2 minutes until they just begin to soften but still retain a bit of “snap.” Add the garlic and ginger, stirring constantly for 30 seconds until the kitchen smells intensely fragrant.
Add the frozen peas into the mixture. The residual heat will thaw them instantly, preserving their vibrant emerald green color. Move the vegetable mixture to the outer edges of the pan, creating a well in the center for the next crucial step.
Phase 3: Crafting the Wispy Egg Ribbons
Pour the whisked eggs into the center of the pan. Let them sit for 10 seconds to set slightly, then use your spatula to gently “ribbon” the eggs by pushing the cooked edges toward the center. This creates thin, delicate yellow folds rather than a dense scramble. Once the eggs are 80% cooked, break them into wispy pieces and incorporate them with the vegetables.
Phase 4: The High-Heat Marriage and Toasting
Turn the heat up to high and add the remaining oil. Add the chilled rice to the pan. Using a folding motion, combine the rice with the egg and vegetable mixture. Spread the rice out across the surface of the pan and let it sit undisturbed for 1 minute. You should hear a distinct crackling sound—this is the rice toasting in the oil to create that golden-brown sheen.
Drizzle the soy sauce and toasted sesame oil around the edges of the pan so it “sears” before hitting the rice. This adds a light umami glaze that coats each grain without making it soggy. Toss everything together, adding the chicken back into the pan. Season with white pepper and a pinch of salt if desired.
Professional Tips for Crystalline Grains and Deep Flavor
- The “Old Rice” Rule: Freshly cooked rice contains too much moisture. If you must use fresh rice, spread it on a baking sheet and place it in front of a fan for 20 minutes to dehydrate the surface.
- Avoid Overcrowding: If your pan is too small, the rice will steam instead of fry. If making a double batch, fry the rice in two separate stages to maintain high heat.
- The Soy Sauce Drizzle: Never pour soy sauce directly onto the rice. Pouring it down the hot sides of the pan caramelizes the sugars in the sauce, creating a deeper “wok hei” flavor.
- Texture Visuals: Look for the rice to “dance” or jump in the pan. This indicates that the moisture has evaporated and the grains are truly frying.
Safe Storage and Reviving Your Fried Rice
Chicken Fried Rice stores exceptionally well, making it a favorite for lunch the next day. Place leftovers in an airtight container and refrigerate for up to 3 days. To reheat, add a teaspoon of water or a tiny splash of oil to a pan and fry over medium heat until steaming through. This restores the glistening texture better than a microwave.
While you can freeze fried rice for up to a month, the texture of the peas and carrots may soften slightly upon thawing. Always ensure the chicken is heated to an internal temperature of 165°F (74°C) when reheating for safety.
Creative Pairings and Menu Inspiration
This savory Chicken Fried Rice is a complete meal on its own, but it also pairs beautifully with other Asian-inspired textures. For a complete feast, consider serving it alongside a crisp fusion-style salad or some summer vegetable side dishes to balance the richness of the soy glaze.
If you are looking for a different protein profile, you might enjoy our teriyaki-style twist which offers a sweeter glaze. For those focusing on lean proteins, these Mediterranean chicken meatballs can be a unique side, or you can explore more high-protein vegetarian meals if you are hosting a diverse group of diners.
Common Questions About Master-Class Fried Rice
Yes, but thighs are preferred for their higher fat content, which keeps them succulent during high-heat searing. If using breasts, cook them quickly to avoid drying them out.
To achieve ‘wok hei’ at home, use a heavy-bottomed pan like cast iron and cook in small batches. Drizzling the soy sauce down the hot sides of the pan to caramelize it also helps mimic the flavor.
Use an oil with a high smoke point like peanut oil, canola oil, or vegetable oil. Avoid using only butter or sesame oil for the frying stage as they will burn at the temperatures required for a proper sear.
Fried rice becomes mushy if you use freshly cooked, warm rice. Fresh rice has too much moisture, which causes it to steam rather than fry. Always use chilled, day-old rice for the best grain separation.
White pepper is traditional in many Asian dishes because it provides an earthy, floral heat that blends into the sauce visually and offers a more nuanced spice profile than black pepper.
The Ultimate Chicken Fried Rice Recipe Card
Chicken Fried Rice with Glistening Jasmine Grains and Seared Thighs
Ingredients
Equipment
Method
- Ensure your chilled jasmine rice is broken into individual grains with no clumps.
- Heat 1 tbsp oil in a skillet over medium-high heat. Add chicken thighs and sear for 3-4 minutes until golden-brown edges form and centers are moist. Remove and set aside.
- Add 1 tbsp oil, carrots, peas, garlic, and ginger. Stir-fry for 2-3 minutes until fragrant and carrots are slightly tender.
- Push vegetables to the side. Pour eggs into the center. Let set for 10 seconds, then gently fold to create wispy ribbons. Incorporate with veggies.
- Add final 1 tbsp oil and the rice. Turn heat to high. Let the rice sit for 1 minute to toast, then fold together.
- Drizzle soy sauce and sesame oil around the edges of the pan. Add chicken back in, toss with white pepper, and garnish with green onions and black sesame seeds.
Notes
Drizzle soy sauce down the sides of the pan for a caramelized flavor.
Closing Thoughts on This Culinary Masterpiece
Mastering Chicken Fried Rice is about more than just following a list of steps; it is about observing the sensory cues of the kitchen. The sound of the rice crackling, the sight of the golden-brown chicken edges, and the smell of toasted sesame all come together to create a dish that is far superior to any takeout. We hope this guide helps you achieve the perfect, glistening results you see in our charcoal bowl photography.
Did your rice achieve that perfect separation? We would love to hear about your results in the comments below! If you enjoyed this recipe, please share it with your friends and be sure to pin it to your favorite boards on Pinterest so you can find it every time the craving for umami-rich comfort food hits.